Wednesday, November 22, 2006

Rum Balls

There was only a few dishes that I could make as a kid. I felt so proud as if I have accomplished something great by making a dish to the school fair. However there were some experiments that I just wish I could forget. Everytime someone from my childhood mentions how I have grown up and now can cook, my dad tells this one story. A story I would rather forget.
But after reading Trupti's post about her devious darlings, I thought well I should be really laughing about it now. And I am now. Well now you are wondering what this story is all about. Well it started when I was about 12 or 13 when I thought I had already out grown the need for adult supervision. So when my parents weren't at home (and my 15 year old bro was 'da man of da house'), I decided to make toffee.
Toffee is caramalised sugar and is a favourite at kids parties (why wouldn't it be! it is basically just sugar). And after hearing the recipe from my friend (who had made it herself) okay this can't be that hard, I'll make it. Well it is basically making a sugar syrup that with solidfy. And when hearing the recipe I thought I would know when this point was. But in reality, I burnt it. This was the point where brother dear came in going, what's the smell? with me replying 'nothing' and thus he returned to watching tv.
Well since I had burnt it I thought I couldn't do anything with so I thought I would pour it into the trash. And I did this when it was hot! And long and behold, our plastic trash can started melting! Lucky it didn't melt the whole thing otherwise I would be trouble.
So from that day onward, my dad repeated that story to EVERYONE. Everyone who heard the trash can melting story told me to stay away from kitchen for ever, even when I was 20. Of course I'm not the type of person that actually listens to what any one says and kept on going (and ended up here! :)) Well that experience did scare me of cooking a little but not entirely. Not enough to stop me making Rum Balls (without rum, a PG version) that involved no heating element!
These are a really yummy kid's food but adults are kids at heart and love them anyway. I have heard you can coat these with chocolate but never tried them as I was scared of the stove for a good couple of years after that. But as I had a small get together on the weekend I thought it would be a good idea to make them again.
This recipe I usually don't use measurements as I can tell if it enough or not but this time I did so that I can share it with you guys.
So I am sharing this recipe with you on the condition you never repeat the trash can melting story or mention it to anyone (including me!) :)

Rum Balls

Ingredients
1 250g packet Marie biscuits- or other plain biscuits.
1/3 cup desiccated coconut- you can add up to 1/2 cup to suit your taste.
3 tbsp unsweetened cocoa powder
1 395g can sweetened condensed milk
extra desiccated coconut for rolling.

Method
  1. Powder the biscuits in food processor. If this has some small bits it is okay.
  2. To this add the coconut and cocoa powder and mix.
  3. Add the condensed milk and mix until well combined
  4. Now wet your hands a little and roll a small ball of the mixture. Then roll in coconut coat.
  5. Repeat the last step until you have used all the of the mixture.

Labels: ,

Monday, November 20, 2006

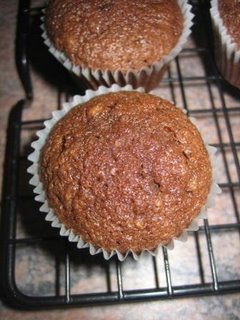
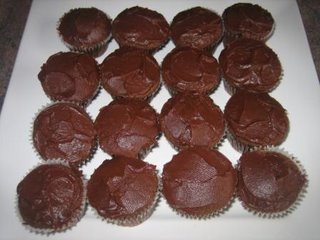
Mini Chocolate Almond Cakes

Sometimes you just want to fly caution to the wind and be bad. REAL BAD. And this weekend I did just that.
Albie, my vegan friend, brought these into work and we finished them off within minutes. As they were mini you didn't have to feel guilty about it (but not when you have 6!). Anyway, as a group we established that vegan food isn't too healthy it doesn't taste good and after getting the recipe off him we established that vegan food sometimes just isn't all that healthy (but just tastes yummy!).
As after nagging him for a week I got the recipe off him. It was a standard recipe that he had used veganised by using egg replacer instead of eggs, margarine instead of butter.
Well the original recipe called for hazelnuts (actually the meal) and of course I didn't have these in stock so I used almond meal (by grinding up some slivered almonds), and the almonds really take this cake to the next level. And I tried making it vegan but realised that I had two spoons of Margarine left so I stuck to the original non vegan recipe.
Well enough blabbering, here it is!

Mini Chocolate Almond Cakes

Ingredients
100g dark eating chocolate- coarsely chopped.
3/4 cup water
100g butter-sofened.
1 cup brown sugar- firmly packed.
1/4 cup cocoa powder
3/4 cup self raising flour
1/3 cup almond meal
3 eggs

Icing Ingredients
50g dark eating chocolate- melted over a double boiler.
50g butter- softened.

Method
  1. Preheat oven to 180 degrees Celcius (160 if fan forced). Line a mini muffin tray with papers. This recipe yields 3 dozen mini muffins.
  2. Melt chocolate over a double boiler or in the microwave. Stir in water.
  3. Beat butter and sugar in a medium mixing bowl until light and fluffy. To this add eggs, one at a time until just mixed.
  4. Stir in the cocoa, almond meal, flour and chocolate water.
  5. Bake this in the oven for about twenty minutes.
  6. Meanwhile prepare icing by mixing the chocolate and butter until smooth.
  7. When cakes are cool ice them. AND EAT!

I was going to submit it for Jihva for Jaggery but wasn't sure if brown sugar would be accepted as a 'jaggery'. Will just have to get mum to give me a good recipe! :)

Labels: ,

Stuffed Okra

On the weekend I tried Supriya's Stuffed Okra and it was so good! I think I went a bit crazy with the truss tomatoes I got on sale so it was a bit sour but the Okra tasted really yummy with the stuffing.
Thanks Supriya (of Spice Corner)

Labels:

Friday, November 17, 2006

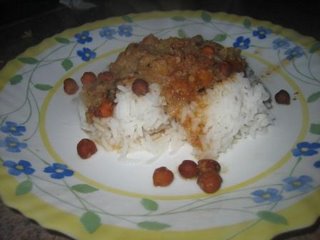
Chickpea Pulusu

After blogging a few months now, my 'Recipes to Try' list has gone through the roof. I thought I should bring it down a bit so I focused on trying the things I wanted to try.
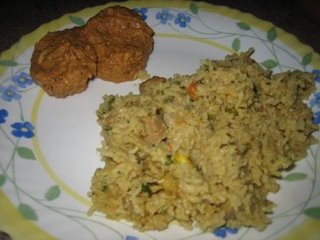
I started off with Nandita's Egg Curry and paired it with Sailu's Soya Chunks Vegetable Pulao
My hubby is not big on potato so I had to venture out and get my a bag of potatoes to make us Rooma's Jhatpat Aloo Paratha with a bit of potato curry. And since I had bit more time up my sleeve I made Zuccini Chutney. This the same recipe as my Red Capsicum Chutney but instead of capsicum, I made with zuccini. These chutneys are so handy I don't know what I did before them :)
And everyday I add more and more that I think hubby will never say, 'What! We have that again?'. And I would like to thank to all for sharing all your recipes that keeps the variety in my kitchen and the balance in my diet.
I know I am late for Meeta's Monthly Mingle but I am hoping she accepts my post as my way giving thanks to you all. So here goes.This recipe is actually my mother in law's and knowing my love for all things beany, she made this for me. It is quick and simple and great way to satisfy my urge for beans :).
Chickpea Pulusu

Ingredients
1/2 cup chickpeas- I made this with the small brown chickpeas. You can make it with any bean you prefer such as black eyed beans.
2 small onion
1 small tomato- diced.
1 small potato - diced.
4 dried red chillies- fried in a bit of oil.
1/2 cup fresh or frozen coconut
1 tsp coriander powder- freshly roasted and ground.
1/2 tsp cummin powder- freshly roasted and ground.
2 stalks fresh coriander- finely chopped.
1 lime sized ball of tamarind- soaked.
1 tsp salt- adjust as required.

Method
  1. Soak the beans overnight and then pressure cook until tender
  2. Grind together: coconut, fried dried red chilies, coriander powder, cummin powder, 1/2 an onion. This is your masala base.
  3. In a saucepan, add the masala, salt, tamarind pulp, cooked chickpeas, potoato, remaining onion (diced), tomato. I usually reserved about 1/4 of the chickpeas which I grind and add to the pulusu to make the gravy thicker.
  4. Bring to the boil and then simmer until the potato is cooked.

Labels: , , ,

Monday, November 13, 2006

Bread Bondas

After making the baked bean and egg toasties, I had some leftover bread and some leftover potato curry. So I thought I would make a few Bread Bondas.

This recipe I learnt from a family friend, Sathyavathi aunty. She actually deep fried it and it tastes much better fried but the fat content hits the sky. And since I had the toasties going on I thought I would see what happens if I make it in the oven. Well it isn't golden brown and the bread pretty much became a biscuit but it was OK. If you want to splurge a bit then definately try it fried.

Bread Bondas

Ingredients
Some curry/filling- I used potato curry but any dry curry will work.
1 bread slice- a day old is preferred with crusts removed. Btw 1 bread slice per bonda. So depends on how much curry you have.

Method
  1. Like the toasties, wet the bread and squeeze the excess water.
  2. Now take a bit of the curry, rolled in a ball and carefully wrap it with the bread.
  3. Take care that all the joins a properly covered.
  4. Deep fry until golden brown or bake until the bread is dry on the outside.


Labels: ,

Baked Bean and Egg Toasties

When Nandita's (of Saffron Trail) WBB#7 theme was Baking, I scratched my head. Because I like baking and have a few muffins, breads and cakes up my sleeve but I didn't think I would eat any of it for breakfast. Even the savoury ones I couldn't really see myself getting up in the morning and baking (and of course eating!).

Then I remembered! I had come across this recipe ages and ages ago (from an unremembered source) but I had modified it to suit my indian snacking needs. Instead of the baked beans and egg, I would make them with whatever curry was leftover in the fridge for unexpected guests. This was impressive enough for my guests! :)

So I thought I shall come back to the original authentic Aussie recipe. Baked beans is a true Aussie icon. So much so that when Shane Warne went to India in 1998 for World tour he couldn't live just plain old Indian food (please note the sarcasm!) that he had to get a pallet of baked beans to keep him happy. It is a typical Aussie breakfast to have this with toast. Baked beans is nothing much more than cooked navy beans in tomato sauce. So I guess this a twist to the average baked bean breakfast. Enjoy! :)

The recipe below is for one toasty so just make as many as you need. I used a muffin tray for this, but hindsight is a beautiful thing, and I think you are better off using small souffle bowls or a texan muffin pan.

Baked Bean and Egg Toasties

Ingredients
1 bread slice- a day old is preferable and crusts are to be removed.
2 tbsp baked beans- from the can or cooked navy beans mixed in tomato sauce.
1 egg
salt and pepper- to taste.

Method
  1. Preheat oven to 200 degrees Celcius.
  2. Wet the bread and squeeze out excess water. You may want to roll it out lightly othewise just pat with your hand.
  3. Now carefully line the souffle dish or muffin tray with the bread.
  4. Put in oven for about 15 mins or until the bread has started to regain its original texture.
  5. In each shell (still in muffin tray or dish), place about two spoons of baked beans and then crack an egg on top. Alternatively you can put some left over curry.
  6. Place in the oven for another 15 mins or until the egg has cooked. Or the curry has warmed up or crispy on top.
  7. Remove from dishes/muffin tray and serve with salt and pepper.


Labels: , , , ,

Saturday, November 11, 2006

Capsicum Stuffed with Risotto

Whenever I go out to eat, I have an annoying tendancy to try and recreate what I have eaten at home. This is annoying because the time I am eating out I tend to dissect the food rather than enjoy it. My hubby thinks that some foods should be enjoyed when other people make it but I believe it is a challenge to make it at home. This recipe is one such dish that I had out (of all place the office cafeteria!) and attempted to recreate at home. And it was pretty easy as well.

Risotto is a dish that I usually don't like eating out as it is made of rice. Well my logic is I get plenty of rice at home and thus I don't really want to eat it when I go out. This logic also applies to Indian food (well atleast South Indian). But this doesn't mean I'm very adventurous. I'm fondly called a 'Food Racist' at work due my strict dietary requirements (not requirements but preferences). Thus hadn't eaten Risotto (or a vast range of dishes) until my better half came along.

And ofcourse once I had it once, it became a regular lunch item at our house. It is simple and filling whilst being healthy. But this dish is a twist to just serving in a bowl. Baking it in the oven just gives it the extra flavour and crunch!

Capsicum Stuffed with Risotto

Ingredients
1 large red capsicum- cut in half with seeds scooped out.
1 cup aborio rice
1 tbsp olive oil
1 small onion- finely chopped.
2 garlic cloves-finely chopped.
2 dried shitake mushrooms- soaked in boiling water then chopped.
5 sundried tomatoes- chopped.
1 small zuccini- chopped.
1 tbsp tomato paste
1 vegetable stock bullion
fresh basil
1 tsp salt- adjust as required.
1 tsp pepper- adjust as required.
some tasty cheese- optional.

Method
  1. Preheat the oven to about 180 degress Celcius
  2. In a saucepan, bring to the boil about 8 to 10 cups of water. Drop the buillion in and reduce the heat to a simmer.
  3. In a seperate large saucepan, add the olive oil. Sautee the garlic and onions until they turn golden brown.
  4. Add the aborio rice to the onions and sautee until they appear transulent with a white core. This takes about 1 minute.
  5. Now add about a cup of the simmering vegetable stock to the rice and mix until absorbed. Repeat this procedure until the rice is about half cooked.
  6. Add the chopped zuccini, mushrooms, sundried tomatoes and tomato paste and stir through.
  7. Continue adding the stock a cup at a time and stirring until it has been absorbed by the rice. Repeat this until the rice is cooked through. The amount of stock required depends on the rice and how cooked you want the rice to be (some like it al dente and some like it soft). Adjust the amount of stock you add to the rice as you require.
  8. Add the basil leaves when rice is cooked and turn off heat. This can be served on its own.
  9. Using half a capsicum as bowl, fill to the top with the risotto and sprinkle with some cheese.
  10. Cook in the oven for about 20 mins and serve.

Labels: , ,

Sunday, November 05, 2006

Nippat Masala

I used to live in Banglore when we were India. Now Bangloreans know how to have food. Every type of food I have had in Banglore has been top notch that I am still thinking about it. The thing that I like most about Banglore is their street food.
Everytime I go there I am a big fan of CHAAT. Bhel puri, masala puri, pani puri, moti masala, and the list goes on. I can go to a chat house and have dinner there. My mother in law got worried when I said I didn't want dinner but Chaat instead.
Everyone that goes to India is worried about food contamination and are scared to eat roadside. However this is the best kind of food!
There was a man near our house in the mid 80's that used to sell chaat near my house. And his food was so good that we would want to visit him even before our family. Every couple of years we would go to India and make a special trip to his little 'bandi' (cart). We did this for a span of 20 years. And each time he would remember who we were and ask about how we were and what we were doing. But I was dissapointed when he stopped coming to the roundabout a couple of years ago. A few trips ago I found out he wasn't selling chaat anymore and no one knew where he went. Well that's what you probably get for coming once everyone 2 years!
However I attempted to recreate his magic at my house with Nippat Masala. The masala is this context is basically a mix of tomatoes, onions, coriander, lemon juice, salt and chilli powder. Street food, especially Banglore street food, this masala is put on everything. They put it on Mirchi Bhaji, they put it in puffed rice (to make bhel puri), they put it on 'Motis' (also referred to as gold finger. I think I have to make a seperate post about this altogether), and the list goes on.
One such item with this masala mix is Nippatu. Nippatlu are basically a snack food is the same family as Muruku. A recipe for it can be found here. Well I had some of these which I bought and so I thought I would bring back the taste of Banglore with it. So I hope you enjoy! :)

Nippat Masala

Ingredients
Some premade nippatulu- broken to bits.
1 small onion- finely chopped.
1 tomato-finely chopped.
1/2 bunch coriander-finely chopped.
1 lemon- juiced.
1 tsp salt- adjust as required.
1 tsp chilli powder- adjust as required.

Method
  1. Another great recipe. MIX AND SERVE!

Labels:

Thursday, October 26, 2006

Chicky Chicky!

After the day of eating rich foods and heavy meals, the next day we weren't too keen on a big breakfast. Since I had some Turkish bread I thought I would make a simple hummus and chickpea salad. Short and sweet but high in calcium!

Hummus

Ingredients
1 can chickpeas or 400g chickpeas soaked overnight and cooked
1 or 2 garlic cloves- minced finely.
1 lemon- juiced.
1 tbsp tahini- this is seasame butter (like peanut butter but made with seasames).
1 tsp salt- adjust as required
1 tsp pepper- freshly ground

Method
  1. In a mortar add the garlic and salt and crush until the mix is sort of glossy
  2. Add lemon juice to the this mix.
  3. Now add a teaspoon of tahini and mix well. Reapeat this until it is difficult to move your spoon in this mixture. It is really important that you mix well after adding the tahini otherwise it will come out bitter.
  4. Grind the chickpeas a little. Grind them until you have the texture you require. Add the tahini mix to the chickpeas.
  5. Mix it all up and add pepper. Taste and adjust seasonings. If it tastes bitter add a bit of lemon juice.

Chickpea Salad

Ingredients
1 can chickpeas or 400g chickpeas soaked overnight and cooked
1 carrot- finely chopped.
1 cucumber- finely chopped.
2 or 3 lettuce leaves- ripped into small bits.
1 lemon- juiced.
1 tsp salt- adjust as required
1 tsp pepper- freshly ground

Method
  1. This is the easiest recipe. MIX AND SERVE. :)

Labels: , ,