Wednesday, November 22, 2006

Rum Balls

There was only a few dishes that I could make as a kid. I felt so proud as if I have accomplished something great by making a dish to the school fair. However there were some experiments that I just wish I could forget. Everytime someone from my childhood mentions how I have grown up and now can cook, my dad tells this one story. A story I would rather forget.
But after reading Trupti's post about her devious darlings, I thought well I should be really laughing about it now. And I am now. Well now you are wondering what this story is all about. Well it started when I was about 12 or 13 when I thought I had already out grown the need for adult supervision. So when my parents weren't at home (and my 15 year old bro was 'da man of da house'), I decided to make toffee.
Toffee is caramalised sugar and is a favourite at kids parties (why wouldn't it be! it is basically just sugar). And after hearing the recipe from my friend (who had made it herself) okay this can't be that hard, I'll make it. Well it is basically making a sugar syrup that with solidfy. And when hearing the recipe I thought I would know when this point was. But in reality, I burnt it. This was the point where brother dear came in going, what's the smell? with me replying 'nothing' and thus he returned to watching tv.
Well since I had burnt it I thought I couldn't do anything with so I thought I would pour it into the trash. And I did this when it was hot! And long and behold, our plastic trash can started melting! Lucky it didn't melt the whole thing otherwise I would be trouble.
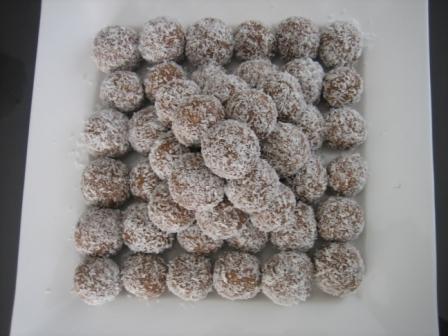
So from that day onward, my dad repeated that story to EVERYONE. Everyone who heard the trash can melting story told me to stay away from kitchen for ever, even when I was 20. Of course I'm not the type of person that actually listens to what any one says and kept on going (and ended up here! :)) Well that experience did scare me of cooking a little but not entirely. Not enough to stop me making Rum Balls (without rum, a PG version) that involved no heating element!
These are a really yummy kid's food but adults are kids at heart and love them anyway. I have heard you can coat these with chocolate but never tried them as I was scared of the stove for a good couple of years after that. But as I had a small get together on the weekend I thought it would be a good idea to make them again.
This recipe I usually don't use measurements as I can tell if it enough or not but this time I did so that I can share it with you guys.
So I am sharing this recipe with you on the condition you never repeat the trash can melting story or mention it to anyone (including me!) :)

Rum Balls

Ingredients
1 250g packet Marie biscuits- or other plain biscuits.
1/3 cup desiccated coconut- you can add up to 1/2 cup to suit your taste.
3 tbsp unsweetened cocoa powder
1 395g can sweetened condensed milk
extra desiccated coconut for rolling.

Method
  1. Powder the biscuits in food processor. If this has some small bits it is okay.
  2. To this add the coconut and cocoa powder and mix.
  3. Add the condensed milk and mix until well combined
  4. Now wet your hands a little and roll a small ball of the mixture. Then roll in coconut coat.
  5. Repeat the last step until you have used all the of the mixture.

Labels: ,

Monday, November 20, 2006

Mini Chocolate Almond Cakes

Sometimes you just want to fly caution to the wind and be bad. REAL BAD. And this weekend I did just that.
Albie, my vegan friend, brought these into work and we finished them off within minutes. As they were mini you didn't have to feel guilty about it (but not when you have 6!). Anyway, as a group we established that vegan food isn't too healthy it doesn't taste good and after getting the recipe off him we established that vegan food sometimes just isn't all that healthy (but just tastes yummy!).
As after nagging him for a week I got the recipe off him. It was a standard recipe that he had used veganised by using egg replacer instead of eggs, margarine instead of butter.
Well the original recipe called for hazelnuts (actually the meal) and of course I didn't have these in stock so I used almond meal (by grinding up some slivered almonds), and the almonds really take this cake to the next level. And I tried making it vegan but realised that I had two spoons of Margarine left so I stuck to the original non vegan recipe.
Well enough blabbering, here it is!

Mini Chocolate Almond Cakes

Ingredients
100g dark eating chocolate- coarsely chopped.
3/4 cup water
100g butter-sofened.
1 cup brown sugar- firmly packed.
1/4 cup cocoa powder
3/4 cup self raising flour
1/3 cup almond meal
3 eggs

Icing Ingredients
50g dark eating chocolate- melted over a double boiler.
50g butter- softened.

Method
  1. Preheat oven to 180 degrees Celcius (160 if fan forced). Line a mini muffin tray with papers. This recipe yields 3 dozen mini muffins.
  2. Melt chocolate over a double boiler or in the microwave. Stir in water.
  3. Beat butter and sugar in a medium mixing bowl until light and fluffy. To this add eggs, one at a time until just mixed.
  4. Stir in the cocoa, almond meal, flour and chocolate water.
  5. Bake this in the oven for about twenty minutes.
  6. Meanwhile prepare icing by mixing the chocolate and butter until smooth.
  7. When cakes are cool ice them. AND EAT!

I was going to submit it for Jihva for Jaggery but wasn't sure if brown sugar would be accepted as a 'jaggery'. Will just have to get mum to give me a good recipe! :)

Labels: ,

Monday, October 23, 2006

Deepavali Shubhakankshalu (Happy Diwali!)

Happy Deepavali (Belated) to all of you! Hope all of you have a properous and happy year!

Of course Deepavali is not the same without the sweets. So here I am writing up my two cents on my version of Kheer.

This is a pretty simple recipe and I hope it makes it to round two of JFI - Diwali Treats hosted by Vee at Past, Present and Me.

Kheer

Ingredients
1 cup cooked rice
1 cup sugar
1 litre milk
a few cashews- chopped.
a few sultanas
1 tbsp ghee

Method
  1. Bring the milk to a boil. Add sugar and then reduce to a simmer.
  2. Add the rice to the milk. Let it simmer for about 45 mins to an hour until the mixture thickens.
  3. Meanwhile, heat the ghee in a small fry pan. Add the cashews and when slightly brown, add the sultanas.
  4. Add this to the chopped nuts and sultanas to the Kheer. Voila! There you have Kheer!

Labels: ,

Tuesday, August 22, 2006

Kalakand

As soon as I saw this month's JFI Ingredient was Milk I knew exactly what to make. I thought that being milk based it had to be a dessert and what better than Kalakand.

Well this sweet is probably not really Kalakand but pretty close to it. I have never been a very patient cook and this is probably what has put me off making basundi (one of my favourites!). However this sweet I have been making since I was 10 and I am sure you can get your kids to make (maybe even your husband!).

The thing I really like about this recipe is that if you taste it at each stage during the process it tastes like a different milk sweet. It starts of like khoya then loosely to a basundi flavour, and finally kalakand. So if you like the taste of it somewhere in between just stop cooking.

This dessert is just not an ordinary dessert but was very representive of the immigrant culture. I don't know how it is like in America but when my family migrated to Australia, this was 'THE' sweet to make. It was quick and easy, used a new technology (that was microwave at the time), brought the taste of India and used 'foreign' ingredients. It was a time when using a microwave was pretty new thing to most immigrants let alone cooking in it. This was some 20 years ago. I have seen so many new immigrants taking the latest incarnation of the 'Microwave Sweet' (that was what we referred to it) and looking impressed that they have assimilated to the Aussie lifestyle.

It brings back fond memories as I was the kid who could make a sweet at the age of 10 that was not a cake. Let me know if you have heard of this dessert and I would love to hear your story!

Kalakand

Ingredients
2 cups Full Cream Milk Powder
300 mL Thickened Cream
395 grams Sweetened Condensed Milk
Pistachio Kernels - chopped for decoration. Can use any nuts or omit.

Method
  1. Mix all ingredients together in a microwave safe dish (I use a Corningware dish). Make sure there are no lumps. Taste or lick the spoon. This is stage one. I can't put my finger on what it tastes like but it is good enough to eat now.
  2. On the high setting on the microwave, cook for 6 minutes. Have a careful eye on the microwave as it tends to froth up and spill over. If this happens give a break for 10 or 15 seconds and resume. Also the 'high' setting on the microwaves varies. It is with trial and error that you will get the optimal time taken to get the mix to a stage where the milk solids are starting to come together.
  3. Mix well. Again taste. I think it tastes a bit like basundi at this point of time. Put in the microwave for another 6 minutes. Keep a eye on it for the first few minutes and then it should be okay.
  4. Let it sit the microwave for 5 or 10 minutes after the beep. This gives it some time to fully cook. This still looks a bit raw when you take it straight out but this rest will let it fully cook through.
  5. Decorate with chopped nuts. When fully cool you can cut it into pieces and serve. This tastes good warm, cold or at room temperature.
  6. You can cook it a bit longer if you want a more browner, harder texture to it. Really up to you.

So there is my entry using the various forms of milk in about 15 minutes from start to finish. Enjoy!

Okay after thinking about this for awhile I think I am going to enter it in as an 'Improved Indian Dessert' for From My Rasoi (hosted by Katherine at Toast Point). Well I think it fits into the second category where it has been modified to appeal to the western palate. I was going to make Double Ka Meeta or Bread and Butter Pudding (of course in my style!) but I don't think I have time. I guess you just have to wait for that one to show up some time!

Labels:

Wednesday, August 16, 2006

Krishna Janmashtami Shubakankshalu


Krishna Janmashtami is a festival of Lord Krishna's birthday. Hence I woke up early to celebrate. It is said that along with rangoli, you should draw little feet of krishna coming into the house as to welcome him into your home. I have never been a great rangoli drawer but thanks to the internet I found some good sites (in particular this one) that will help even the artistically challenged (such as myself). So I found this pattern that was small enough that I could do before work (it is Wednesday after all) and still nice enough to entice little ol Krishna. I know that most of you are thinking my god it will make Krishna run in the opposite direction but as I always say 'PRACTICE MAKES PERFECT' so I am going to continue doing rangoli and hopefully Krishna will turn around.


I thought what better way to start my food blogging than doing a recipe of Prasadam. Prasadam is a generic name for all food that is offered to god. However in my home this prasadam is the most popular and is a must when we do any sort of poojas (religious rituals). My mum is famous for hers and mine didn't turn out quite as nice but still not too bad.

Prasadam Recipe

Ingredients
1 cup course semolina (suji)
1 cup sugar
1 cup boiling water
chopped cashews (optional)
sultanas or raisins (optional)
ghee

Method
  1. In a saucepan or wok, add some ghee and fry cashews (if using) on low heat. Once cashews start to change colour add sultanas (also if using). Fry both of them for a few seconds until cashews are golden brown and sultanas have puffed up.
  2. Add the semolina and add some more ghee if you think it is required. Fry until the semolina smells nice (sort of a ghee smell).
  3. Add sugar and boiling water and reduce heat to the lowest setting. Stir until the mix thickens to a dough consistency. This should not take more than 4 minutes.

Once cooled slightly this can be rolled into balls or served in a cup.


Labels: , ,